Carburetors, contrary to popular opinion, are a very basic device similar in relative design since Henry Ford and his Model T. The same basic things make them tick no matter who designed it. People over the years have heard horror stories about carburetors or maybe even had a bad experience firsthand (who hasn’t been at the race track and witnessed a carburetor fire in their lifetime?) but that should not keep you from learning how one works. So without further ado, it’s time to dispel the myths, lies, and black magic.
The first thing required for a carburetor to function properly is atmospheric pressure. Pressure is the most important variable tied to a carburetor’s performance, and without it one simply will not run! Most carburetors will have a vent tube that acts as a “port” to the fuel bowl; this “port” provides the carburetor with pressure from it’s ambient surroundings and forces the fuel to move through the metering passages as required based on engine demand. Manipulation or changing the length of the fuel bowl port can have dramatic affects on the fuel curve of a carburetor and should only be done with the assistance of a professional engine dyno. Many people think that fuel pressure is what moves fuel through a carburetor and they are which is incorrect. Fuel pressure simply pushes the fuel to the carburetor, atmospheric pressure takes over from there.
Another phenomenon a carburetor requires is something we refer to as draw. Draw is essentially what the engine wants from the carburetor in terms of air and fuel. When an engine starts going through the RPM range, draw will increase (naturally as engine speed increases air and fuel demand will as well). As draw increases a carburetor must react to properly mix the air and fuel together. Air and fuel mixture is very important and varies depending on the type of fuel you use as well the elevation you are racing at. The word carburetor gurus use for the process of mixing air with fuel is “atomization”. Atomization is where things get tricky and some black magic comes to play; carburetor manufacturers, modifiers and other fuel system related companies are always searching for more efficient ways to atomize fuel and air.
So how does the atomized fuel get to where it needs to be? This is a question that many might know the answer to - the Venturi effect - named after the Italian physicist Giovanni Venturi, the Venturi effect is a phenomenon where pressure is reduced after air flows through a constricted area. The constricted area in question is easy to spot as it is the skinniest part of the “barrel” on a carburetor. To explain a little further, air rushes past the area with the smallest circumference causing it to speed up and form an area of low pressure right below the venturi, this low pressure will in turn pull (remember our term draw) atomized fuel from the booster venturi and send it along to the intake runners. One thing nearly all carburetors have in common no matter how many barrels is the venturi.
To sum it up; a carburetor will not run without atmospheric pressure, something to mix the fuel and a means of getting the fuel to combustion chamber - these are the basics and the details are where performance is found. Carburetor development has come a long way since Henry Ford’s Model T and each new season of racing brings some innovation giving racers an edge. Still foggy on the principals or want to know more? Give us a call, we love talking about these contraptions and helping people make the most of their race car.
Admittedly a scary title, something every racer should ensure is an adequate fuel system. Sometimes simple things stand in the way of glory and fuel delivery can be the gremlin before the finish line. Here at our tech support office we receive a number of calls each day varying in complexity and nature. One repeating call seems to revolve around a car that seems to “nose over” before the stripe every pass. After running through fuel pressure and ignition parameters it is often determined that the customer might not have a fuel pump that is up to the task and fuel bowls become empty when it counts. Though this problem can mask itself in several variations, having the right pump and regulator will eliminate a lot of potential issues.
Fuel delivery has several key factors affecting it. One factor that determines total fuel flow is lateral acceleration. Most racers mount fuel cells and pumps in the back of their car; this configuration requires the pump to “overcome” the force of acceleration that the car is producing in its pursuit of E.T. One “g” (32 feet / Sec2) will require roughly 10 P.S.I. of pressure to push fuel forward in the line. A larger fuel line means more there will be more fuel in line which is more weight and in turn requires more pressure to move forward - you can see where this is going by now. Modern race engines making the horsepower numbers we see in drag racing today have the potential to be severely underfed by the fuel system.
So if more is better then why not get the biggest pump and turn it all the way up? Have you ever heard the phrase “Too much of a good thing can be a bad thing”? What’s true in most cases proves true in the world of fuel pumps. Increased fuel pressure is generally misconceived as increased volume, in fact it is the exact opposite. Excess fuel pressure means there is more amperage draw on the pump. Higher amperage draws will heat a pump up and lead to cavitation which shortens the life of a pump. Cavitation usually goes undetected and can leave you stranded between rounds with failed fuel pump. The lesson here is that a modern fuel pump does not have to operate at maximum output to meet the demands of most racing engines except in extreme cases. Our advice to the customer is to use the recommended pressure provided by the manufacturer of your particular fuel pump.
Here is an example: A standard 220 GPH = 1,364 lbs. per hour = 2728 HP
In perfect conditions this pump can support more horsepower than the track would see in both lanes!
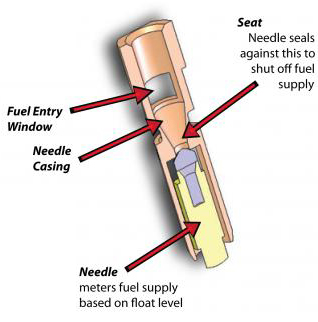
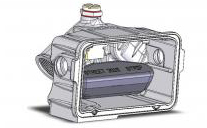
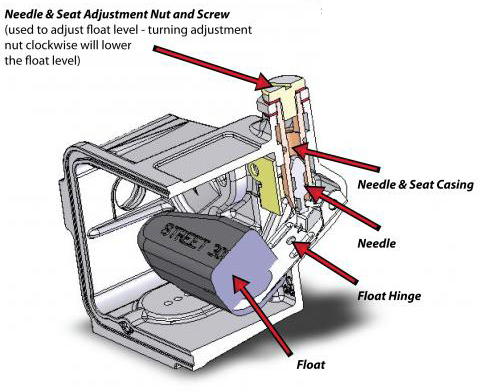
All of our carburetors at Quick Fuel Technology utilize a float system to regulate incoming fuel. The float moves according to volume in the fuel bowl and as the bowl fills up it has to shut off the inlet to prevent flooding (think of the tank on a toilet). If you have your fuel pressure set at 9 p.s.i. then it will require 9 p.s.i. from the float to shut off the inlet (needle & seat). Floats in a carburetor, no matter what brand, are simply not designed or capable of operating at this pressure. Ideally fuel pressure needs to be between 5-7 p.s.i. Setting your float at a pressure of 6.5 p.s.i. is usually a good start and will give you plenty of float travel.
Put simply, more float control leads to a more stable fuel system. A carburetor that can sense and react to variations in fuel level will always be first to the finish line; combine this with a pump and regulator setup that can get the fuel forward and you have a winning fuel system.
Over the years the term “billet” has become synonymous with many things. When the word billet is first heard someone might instantly think the object in question is either shiny or very expensive. This stigmata is something we attribute to the billet wheel boom that took place in the late ’90‘s. There were a few manufacturers that learned to use CNC equipment in ways that were never thought of on that small of scale. Billet wheels and polished goodies became wildly popular and suddenly only the best cars had these features. Technology was trickling down to people who liked to make custom stuff in small quantities - this translated to high expenses. Fast forward to modern day, CNC equipment has become more affordable and the programming required to run these machines is also more user friendly - this translates to lower expenses. So what exactly is a billet part? The term “billet” essentially applies to anything machined out of a solid piece of material - billet wheels are made using a solid piece of round-stock aluminium.
Though there is still a stereotype associated with the word billet, many companies actually save money by manufacturing with this method. CNC machines are very versatile and can machine many different parts in one day. If there is a program wrote for the part and you have the tooling to do the job the capabilities are nearly endless. Forging and casting parts can become expensive because of dedicated tooling and the need for large facilities to house all the equipment. CNC machines are compact and cheaper to operate in comparison.
We here at Quick Fuel Technology made a decision years ago to make several “billet” components. Our company has always put an emphasis on the best quality part money could buy at the best price. Billet carburetor components were the solution to both of our needs. A Quick Fuel Technology carburetor, depending on the series, will have billet parts in it somewhere; billet components allow us to have the highest quality parts and reduce the cost of manufacturing. Reduced manufacturing costs then get passed on to the end customer. Purchasing a new carburetor from us will allow you to get the best quality parts that are normally reserved for custom carburetors at a cost comparable to anything else out there.
So what about the nuts and bolts of billet carburetor parts? When it comes down to fuel metering and circuitry there is no reason you should use anything other than billet for your race application. Cast parts can be unreliable, difficult to machine, and non specific. Simply put, you can do more with billet for less. Quick Fuel Technology metering blocks and throttle bodies are CNC billet aluminium and come packed with features that would be very difficult to replicate with cast parts. Close tolerance, flat surfaces, and zero porosity are just a few of the reasons we made the switch from cast parts years ago. QFT replacement metering blocks utilize screw-in bleeds to determine orifice sizes, changing hole sizes is as simple as a jet change. Cast parts require drill bits and more press-in restrictions to get the calibration right. Anybody that spends time with a carburetor on a dyno can appreciate screw-in adjustability and will also tell you that there is no drill bit that will make a hole smaller.
As carburetor people it’s an easy decision when it comes to what parts to use but if you are still on the fence about what to do with your carburetor or maybe you want to talk more about specs, give us a call, we love to talk engineering and about what makes a carburetor tick.
 Pressure vs. Volume is something a carburetor is dependent upon for proper operation - PRESSURE DOES NOT EQUAL VOLUME. Generally speaking, as pressure increases through a needle and seat assembly the volume will decrease. Increased fuel pressure leads to issues like aeration, fuel spray and starvation. One thing we like to remind people of is the fact that your float has to overcome whatever your fuel pressure is - if your fuel pump and regulator are set to 10psi, then it will take 10psi to shut off the needle. Some float designs are not capable of this, combined with a shortened lever and the problem just compounds itself.
We recommend setting your fuel pressure to 6.5-7.0psi for best performance.

Proper float level on a Quick Fuel Technology carburetor is set with fuel pressure generally falling between 6.5-7.0psi. Once you are certain of your fuel pressure, then it is a matter of adjusting the float height using the adjustment nut. Start by loosening up the lock screw (turn counter-clockwise) by a half-turn or so to free the adjustment nut. Once free, move the adjustment nut to raise or lower the float - clockwise will lower the float, while counter-clockwise will raise the float. With proper fuel pressure, the fuel level should be about halfway up the sight window - once satisfied with your float level, don't forget to tighten the lock screw and wipe away any excess fuel.
